
I love when tools make my life easier. A conversation came up online the other night and I had shown someone a quick summary of the awesome power of Sublime Text. They wanted to know how I made the magic happen in that video. I felt I should and share it with everyone via a blog post. Here’s a quick video of my uses along with a description of what you can do with it, as well as how to make it work.
Category: How To’s
Config-ease with Sublime Text Snippets
Reading Time: 3 minutes
Permanent link to this article: https://www.packetpilot.com/config-ease-with-sublime-text-snippets/
Back To Basics – Patching A Switch
Reading Time: 5 minutes
The other day someone joked that I should write a post about plugging in a cable, or at least something to that extent. Then I started thinking about it. It’s actually a good idea. Everyone has their own way of cabling up a rack of patch panels and switches. Most of us would love to get the exact right length cables for the job however, that’s often not the case. There is a patching strategy I like to use when you are stuck using a box of 7 foot cables when all you really need are 3 foot cables. None the less, we all want it to look as neat as it can when we are done. I’m going to show you my practice when it comes to patching which can be easily modified whether you’r racks follow a panel-switch-panel-switch arrangement or a panel-panel-switch-switch arrangement.
Permanent link to this article: https://www.packetpilot.com/back-to-basics-patching-a-switch/
UC Guerrilla Wallboard on Server 2012 64bit
Reading Time: 4 minutes
I had the circumstances of lack of budget, broken freeware, and understandable need put me in the position of spinning up another unsupported freeware application in the form of a UCCX Call Center Wallboard. As usual, I tend to be a gluten for punishment and tend to try and fight these type of situations into submission. Luckily for me in this case, I had a great solution (UC Guerrilla’s take on the free wallboard), as well as a great resource at my disposal. That resource is none other than one of the best Exchange, Server, and Client engineers I know, and am rather happy to call a friend and colleague; none other than ibageek03 on Twitter.
Permanent link to this article: https://www.packetpilot.com/uc-guerrilla-wallboard-on-server-2012-64bit/
Bulk enable PIM via TCL
Reading Time: 3 minutes
I’ve been working on doing some multicast labs lately and am constantly resetting my lab devices to their default configs and starting from scratch. As many of us know, to enable PIM on all of your interfaces you must go into each interface and enable it manually. There is no default command to enable PIM on all interfaces. We know PIM should be enabled 1 to 1 with interfaces involved in routing making this a boon. With that in mind, and the fact that I am rather comfortable with the concept of needing PIM on the interfaces, and likely speak and type this command in my sleep, I decided to make it easier and modify a previous TCL script I had written to enable PIM on every interface that has an IP address assigned to it. With the great “Send to Chat” feature of SecureCRT I can do this across my entire topology on one fell swoop. In a real world environment, you could use a tool like Solarwinds to push this out to your devices.
Permanent link to this article: https://www.packetpilot.com/bulk-enable-pim-via-tcl/
Daily Learning Actions
Reading Time: 5 minutes
The other night while studying I tweeted out the first six words that came to mind as I thought to myself “How can I retain this better”. The concept is really quite simple and I find myself doing these steps for everything I am trying to learn and retain. While everyone learns *best* a certain way, everyone also learns more by being around the material more. I don’t feel I need to explain how to find what way of learning works best for you. Nor am I going to pretend to have a clue how people learn or retain better in any sort of scientific way. I’m simply going to explain my view on my six word study method.
The Method:
Read, watch, listen, learn, discuss, do!
It’s a simple mantra that you can think about every time you start studying a topic. In fact, you already learn all of these ways throughout the day. The concept here is to apply all six of them to every topic you are focused on studying.
Permanent link to this article: https://www.packetpilot.com/daily-learning-actions/
Linux to Cisco Openswan IPSec Configuration
Reading Time: 6 minutes
[notice]For this example I use the following IP scheme 192.168.0.12|–O–42.42.42.42—–[INTERNET]——12.12.12.12–O–|10.42.42.42[/notice]
I was approached a few weeks back to assist in creating a VPN Tunnel between two end points. Of course in my naivety I readily assumed it was between to Cisco devices but that turned out not to be the case. The tunnel was to be between a Linux box (in this case Ubuntu on a hosted VPS provider) and an unknown endpoint. This tunnel was going to be host to host as opposed to LAN to LAN. After some quick discovery work, getting access to the Linux box, and seeing the required proposal from the other side I started diving into the unknown of Openswan. Luckily, after doing som research for the configuration and verification things started shaping up and much to my approval, a lot of what you would look for in Cisco verification was the same on the Linux box. The configuration goes as such.
Naturally the first step is to install Openswan. As per usual use your distributions software management to install this. The first thing I configured was the ipsec configuration file. On the Ubuntu box this resided in “/etc/ipsec.conf”. The configuration was as follows.
Permanent link to this article: https://www.packetpilot.com/linux-to-cisco-openswan-ipsec-configuration/
Route-Targets Explained
Reading Time: 3 minutes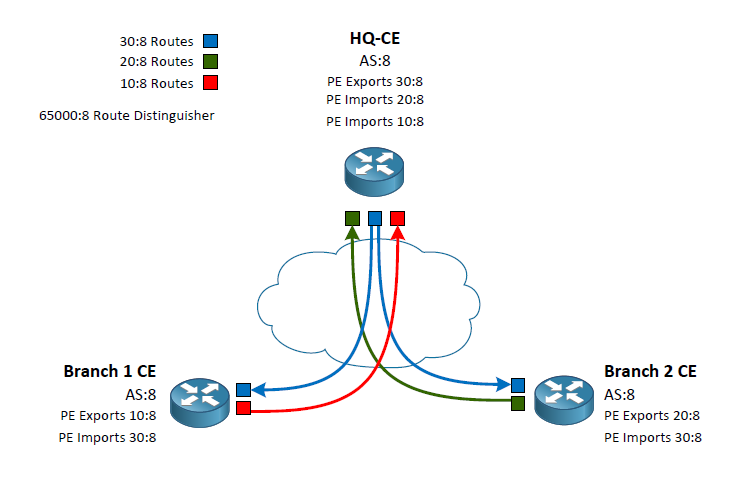
As I began to study MPLS L3VPNs I was excited to start flinging my fingers around the keyboard. However, I ran into a little snafu during my learning. All of the videos and configuration example I was finding didn’t separate the difference between the Route Distinguisher (RD) and the Route Targets. Most of the examples simply matched the RD to the Route Targets and/or used the same Route Targets for both import and export. This left me feeling like I wasn’t really understanding what those commands and numbers were accomplishing. I decided to make a visual representation to make it easier to understand.
Router-Target Policy Visualization
To make this concept easier to understand we first need to know that the RD does not dictate what routes a route will import or export into it’s PE-CE routing process. The purpose of the RD so to add an additional label to prefixes so overlaps can be inserted in the BGP table and shared amongst the various PE routers. For example, my RD of 65000:8 indicates any routers in the BGP table from my customer vrf would indicate a prefix of 10.20.30.40 as 65000:8:10.20.30.40. This means if another vrf with a different RD of 4242:42 could also install 10.20.30.40 in the providers BGP table as 4242:42:10.20.30.40.
Now that we are clear on the use of the RD we can move onto the Route Targets. There are two route targets we define in our VRF policy. The import and export targets. Many examples and videos show these as the same (which is a perfectly valid configuration) often times matching the RD. To clarify exactly what they are used for I have used three different Router Targets. I am going to correlate their indicators with colors to make the example easier to visualize.
Routes exported from the headquarters use 30:8 which we will call the “Blue Routes”
Routes exported from Branch 1 will use 10:8 which we will call the “Red Router”
Routes exported from Branch 2 will use 20:8 which we will call the “Green Routes”
This exporting is done by the PE routers connecting to the CE routers. The CE routers in this example our peering via eBGP with the PE routers inside of a VRF. The VRF configuration on the PE routers is what indicates the Router Target identifier to export. At this point we can write a policy of which routers should be allowed into the individual CE routes using the VRF Route Target import. Lets follow a case from the HQ to Branch 1.
HQ CE peers with its PE router which has a VRF policy stating to export its routes as the color Blue. These routes are passed around to the other PE routers. When the Branch 1 PE peer receives the routes it sees that it’s VRF policy is stating to export its routes as the color Red as well as import any routes that are colored Blue. Back at the headquarters we have our VRF policy set to import both the Red and Green routes. Branch 2 does the same as Branch 1 but swapping out Red for Green.
By writing the VRF policies this way we have created a Branch to HQ connection while not passing routes Branch to Branch. In my diagram I show the routes coming into the CE routes as it is the ultimate end goal however, please keep in mind that the VRF configuration is done on the PE routes.
I hope that by using simple colors for the routes it has simplified the reasons we use the RD, and the import and export Route Target. I found it difficult to understand the true use of these configuration when they were using the same value for the RD as well as the import and export Route Targets.
Permanent link to this article: https://www.packetpilot.com/route-targets-explained/
Trouble shoot with TDR
Reading Time: 5 minutes
This article is another example of trouble shooting by putting multiple pieces together. While it relies upon existing knowledge of the environment in which the article is based it should prove to be a good example of a trouble shooting process that will hopefully be able to spark some creative thinking the next time you have a problem that needs to be resolved.
The scenario starts out with a user ticket stating that the phone isn’t working. After some fact gathering the below details and possible solutions were outlined.
Continue reading
Permanent link to this article: https://www.packetpilot.com/trouble-shoot-with-tdr/
IP SLA for Single Default Route Change
Reading Time: 5 minutes
The scenario goes like this. You are working at your office (R1) and need to change the IP address and default route on the remote device (R2). The issue a factor of two things. The first is the fact that R2 is connected to your network with only one link. The other issue is R2 cannot use any dynamic routing protocols so you are stuck with a default route that is pointing at the next hop. If you are to change either of these facts you lose connectivity to R2. While there are other solutions to making this change, I am going to take the concept of floating static routes and an IP SLA to change both the IP address and the default route.
Permanent link to this article: https://www.packetpilot.com/ip-sla-for-single-default-route-change/
Initial Router Setup For Remote Access
Reading Time: 3 minutes
[notice]PacketPilot / P2Labs does not guarantee any certification results in using the content of this website. Please keep in mind these are free tools to aid in your learning and certification goals. All efforts are made to ensure the accuracy and content in these labs. Hard work, dedication, and official Cisco training materials are recommended for your training.[/notice]
The following lab can be completed using any Cisco Emulator supporting the appropriate feature(s).
The purpose of this lab is to reinforce basic router configuration including naming the router, connecting two routers via an ethernet connection, and establishing logon procedures for remote access including secure remote access. Remote access if a key design feature of any network. It provides efficiency of management by preventing unnecessary trips to distant devices for simple tasks. Secure access is provided to prevent unauthorized access and data gathering from packet captures on plain text traffic.
Permanent link to this article: https://www.packetpilot.com/initial-router-setup-for-remote-access/