[notice]PacketPilot / P2Labs does not guarantee any certification results in using the content of this website. Please keep in mind these are free tools to aid in your learning and certification goals. All efforts are made to ensure the accuracy and content in these labs. Hard work, dedication, and official Cisco training materials are recommended for your training.[/notice]
The following lab can be completed using any Cisco Emulator supporting the appropriate feature(s).
The purpose of this lab is to reinforce basic router configuration including naming the router, connecting two routers via an ethernet connection, and establishing logon procedures for remote access including secure remote access. Remote access if a key design feature of any network. It provides efficiency of management by preventing unnecessary trips to distant devices for simple tasks. Secure access is provided to prevent unauthorized access and data gathering from packet captures on plain text traffic.
Lab Task List
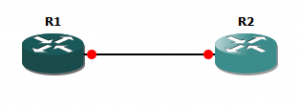
- Configure the host names on the routers to match the diagram above
- Configure an Ethernet Link between R1 and R2:
- IP address 172.16.12.0X/27 where “X” is the router number.
- Configure local usernames on both routers:
- Username is AdminX where “X” is the router number
- Password is P@ssw0rd
- Configure the enable secret to be P2Labs
- Configure the router to hide all plain text password
- Configure R1 to accept only telnet connections on all remote access lines. Telnet should request the local credentials
- Configure R2 to accept only SSH connections on all remote access line. Use local login accounts and SSH Version 2.
- Ensure that remote sessions are disconnected after 5 minutes of inactivity
- Verify the configuration by opening a telnet connection from R2 to R1.
- Verify the configuration by opening an ssh connection from R1 to R2
Lab Task List
- Configure the host names on the routers to match the diagram above
Router#configure terminal
R1(config)#hostname R1
R1(config)#end
R1#
Router#configure terminal
R2(config)#hostname R2
R2(config)#end
R2#
- Configure an Ethernet Link between R1 and R2:
- IP address 172.16.12.0X/27 where “X” is the router number.
R1#configure terminal
R1(config)#interface FastEthernet0/1
R1(config-if)#ip address 172.16.12.01 255.255.255.224
R1(config-if)#no shutdown
R1(config-if)#end
R1#
R2#configure terminal
R2(config)#interface FastEthernet0/1
R2(config-if)#ip address 172.16.12.01 255.255.255.224
R2(config-if)#no shutdown
R2(config-if)#end
R2#
- Configure local usernames on both routers:
- Username is AdminX where “X” is the router number
- Password is P@ssw0rd
R1#configure terminal
R1(config)#username Admin1 password P@ssw0rd
R1(config)#end
R1#
R2#configure terminal
R2(config)#username Admin2 password P@ssw0rd
R2(config)#end
R2#
- Configure the enable secret to be P2Labs
R1#configure terminal
R1(config)#enable secret P2Labs
R1(config)#end
R1#
R2#configure terminal
R2(config)#enable Secret P2Labs
R2(config)#end
R2#
- Configure the router to hide all plain text password
R1#configure terminal
R1(config)#service password-encryption
R1(config)#end
R1#
R2#configure terminal
R2(config)#service password-encryption
R2(config)#end
R2#
- Configure R1 to accept only telnet connections on all remote access lines. Telnet should request the local credentials
R1#configure terminal
R1(config)#line vty 0 4
R1(config-line)#login local
R1(config-line)#transport input telnet
R1(config)#end
R1#
- Configure R2 to accept only SSH connections on all remote access line. Use local login accounts and SSH Version 2.
R2#configure terminal
R2(config)#ip domain-name P2Labs.com
R2(config)#crypto key generate rsa general-keys modulus 2048
R2(config)#ip ssh version 2
R2(config)#line vty 0 4
R2(config-line)#login local
R2(config-line)#transport input ssh
R2(config)#end
R2#
- Ensure that remote sessions are disconnected after 5 minutes of inactivity
R1#configure terminal
R1(config)#line vty 0 4
R1(config-line)#exec-timeout 5
R1(config)#end
R1#
R2#configure terminal
R2(config)#line vty 0 4
R2(config-line)#exec-timeout 5
R2(config)#end
R2#
This will be the how/why of the lab.

